Sunday, August 30, 2009
Great Friend
Good morning!
I got this set (Great Friend) when it was in the Occasions Mini catalogue earlier this year and I don't know why, but I haven't played with it at all. Boo!
So, the other day I grabbed it and had so many ideas running through my head, I couldn't get one to stick. This poor card has been sitting lonely, half done in pieces on my table for 4 days.
It uses Perfect Plum and Bashful Blue, I stamped the butterfly on Perfect Plum in White Craft ink, then embossed it with clear powder, the Bashful Blue butterfly is done with just Bashful Blue Classic ink. I used my markers to create the two colours on one stamp. There's the "Eyelet" Texturz Plate for the Big Shot, some half back pearls and some sponging/paper piercing.
Oh, and, the sentiment was stamped onto one of the tags that is on the Matchbox die for the Big Shot.
Busy weekend and it's going to be a busy Monday - we're so lucky!! Our dryer has died and I have an entire week's worth of laundry plus work clothes that needs to be done. Can you say AWESOME!?!
But, you have a great rest of your weekend!
Friday, August 28, 2009
I'm back
Hi! Whew...it's been busy around here. So much to do before I head back to work. Problem is, I can't quite seem to get my brain to work. It's like I've lost all concept of time.
Anyhow...
Today is someone's birthday who is VERY special to me. I love her very, very much and wanted to give herself a little something she's been waiting for for quite some time.
Remember way back in March (are you thinking about it?)...well, we had Regionals here for Stampin' Up! and a fabulous demonstrator was there who showed us how to make these little scrapbooks using business envelopes. Paula Goff is the originator of this design and they're fantastic!!
I had made a couple (one of each of the kids) to give to hubby's grandma (who's AWESOME!) and she takes them everywhere with her. Before I gave them to her, I showed this special someone and she was in love.
I didn't want to make her one right away...I was hoping she'd forget about them so I could surprise her. I also made up some all occasion cards for her to use, 'cause if I don't make them for her...she doesn't include a card with the gift! :)
I used Tea Party DSP, Pretty in Pink card stock, 1/4" grosgrain ribbon, half back pearls, both sizes of the tag punch, Great Friend & Party Hearty stamp sets.
Thanks for your patience in my negligent posting!
Friday, August 21, 2009
Flight of the Butterfly
Hi there!
Quick post this morning...this card uses Flight of the Butterfly. A personal favourite!
Bashful Blue, Mellow Moss and Whisper White make up the colours, Whisper White 1/4" grosgrain ribbon and the Scallop Edge punch. This is a 2-step stampin' set, so when you're using this one, I would highly recommend using the Stamp-A-Ma-Jig along with it. It's that tool that allows for perfect placement every time. 'Cause there's nothing worse than a crooked butterfly ;)
Looking at this card, I'm thinking I will alter it using the new Butterfly punch. I might be back this afternoon....
Thursday, August 20, 2009
Some more All in the Family
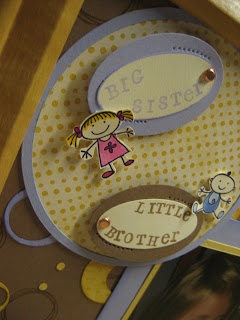
This is the other one that I wanted to show you. The princess and I finished it up yesterday morning while the prince was napping.
It's slightly different than the first, and it took us some time to get the "big sister, little brother" thing just right. We used Calendar Alphabet & Numbers for the letters. At first, we punched them out with a 1/2" circle punch. That was a little too big, especially considering I would have chosen to layer them onto 3/4" circles.
While I'm happy with the end result, part of me wishes that the Large Oval punch had an Extra Large Oval companion. I'm selfish I guess!
This frame that it's in is a standard frame (not a shadow box) and it does fit with the glass in it, however, I decided that I like it better without the glass.
I used the same colours as yesterday's project, which are Close to Cocoa, So Saffron and Almost Amethsyt. There's also DSP from the Tea Party set.
Enjoy your day!
Wednesday, August 19, 2009
Girls' Night Out project
Good morning!
Here's the project we did for our club meeting last night. You'll notice the "people" are now coloured - they weren't yesterday!
This project was a lot of fun and completely customized! Each of the lovely ladies decided what picture they might like to include and worked around that. There were cats and dogs, grown ups, kids and little people too!
We used All in the Family and Family Phrases, Circle Scissors Plus tool, the Big Shot, circle punches, markers, some paper piercing - my goodness - too much fun all in one place!
I picked up the frame at Michaels' (the south one in London) and lucky me - they're on sale for 40% off! Yesterday there was still a great selection and I might be going back from another one!
Here's a picture of the project inside the frame. It's difficult for me to get a good picture of the project inside the frame because I keep getting in the reflection. My hand, my head, things on the table, the light in the other room. Annoying! But a look at it all the same!
I'm just finishing another one that has a picture of just the royalty in this house - so once it's done, I'll be sure to post pictures!
Have a wonderful Wednesday!
Tuesday, August 18, 2009
All in the Family (lots of family!)
Ohhhh, I just love how much you can do with this set!
This is a little sneak peek of the project will be creating for tonight's club meeting.
A stamper's 10 club is a great way to get that wish list filled without breaking the bank. Each month (we meet every other month) we have Girls' Night Out here in my stamp room. Everyone places a minimum order (which is determined at the beginning of the club) and we rotate hostess benefits! You're guaranteed to get free stuff!
We always make fun projects and get the opportunity to chat and be girls!!
If you're interested in joining a club be sure to send me an e-mail!
Have a good day!
Monday, August 17, 2009
Stampin' Up! promotions!
Good morning!
I wanted to let you know about some of the promotions that Stampin' Up! has until the end of August!
First one is the Growing Up promotion. Get a FREE package of Designer buttons when you spend $45 on stamps in the Growing Up section of the 2009-2010 idea book & catalogue (pages 74-90). You can click here to shop my online store now (Canadians only).
Also, you can join Stampin' Up! right now for only $105. The mini-starter kit is pictured here and includes:
- For All You Do stamp set
- In Color Classic Stampin' Pads (6)
- Whisper White card stock (8-1/2" x 11")
- In Color assorted card stock (8-1/2" x 11")
- Business forms and tools
Have a great day!
Sunday, August 16, 2009
Ballerina (with Punches)
Look at this cutie!
Oh, how I wish I could tell you that she's my original design. But, alas! This little darling was created by Anne Marie Peterson, who so generously shared her!
But!!! The rest of the card is mine!
I made this pretty ballerina for my niece who's just turned 6 years old!
Colours are Perfect Plum, Pale Plum, Whisper White, Blush Blossom (arms, legs, face), Barely Banana (hair) and Chocolate Chip (eyes).
Punches used are Word Window, Heart to Heart, 1/2" circle, 3/4" circle, Scallop Circle and 1/8" circle handheld punch.
I also used the Eyelet Border Punch along the bottom. DSP is Perfect Plum. I used my Glue Pen and Fine Cosmo Glitter to make her tutu sparkle!
Enjoy what's left of your weekend!
Saturday, August 15, 2009
Big Shot - Matchbox
Sticking to a "box" theme I suppose...here's a picture of some matchbox favours I created for a wedding shower.
There's 2 stamp sets used, Fifth Avenue Floral and Yummy (which was a Sale-A-Bration set). I used the Matchbox Bigz XL die in my Big Shot to create all the boxes, the base is Chocolate Chip and the part that wraps around is Bashful Blue. I kept the Bashful Blue piece of card stock large enough that it would cut out the tags at the same time. I used my Chocolate Chip marker to ink up just the words on the Yummy set for the message and then sponged the edges of the tag. There's Chocolate Chip Taffeta Ribbon wrapped around the box and a vintage brad holding the tag on the ribbon.
Cool thing about the Matchbox die? You don't need any adhesive to hold the base together, it folds perfectly and keeps itself in shape. A bit of SNAIL on one edge of the outer wrapped portion of the box and that's it!
Wish me luck - a 1.5 hour kickboxing class ahead of me!
Friday, August 14, 2009
Soccer Camp Thank-you!
Today's the last day of soccer camp for the princess! She's had so much fun this summer. We decided that it would be more fun to do a few weeks here and there of soccer camp - 'cause it's awfully boring waiting for your brother and being stuck around the house during his naps!
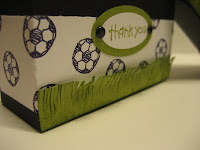
I wanted to give the instructors (counsellors?) a little something to say thank-you and here's what I've come up with.
I used the Sizzix Bigz XL Box #2 die in the Big Shot to create the black boxes. Stamped the soccer ball from Family Accessories along a Whisper White strip. There's a tiny Old Olive strip which I cut using scissors (but not all the way through) to make the grass. The "thank-you" tag was done with the Small Oval and Large Oval punches and there's 2 black brads from the Vintage collection.
On the cards, I used All in the Family & Family Accessories. I cut strips 3/4" wide x 3 for each (kinda like Adidas!) layered my main images onto Old Olive. For one card I did some paper piercing around the Old Olive layer and for the other card, just a piece of black gingham ribbon.
I will fill the boxes with candy (these two really, really like their candy!) and give them to each of them this afternoon.
Have a good day!
Thursday, August 13, 2009
Cheep Talk
Cheep! Cheep! How cute is this set?
I don't know if you've noticed, but I've been shying away from the In Colors. It's not that I don't enjoy change, I've just been finding that EVERYONE in the SU! world has been using the In Colors and I was getting a little bored of seeing them. My least favourite combo - Rich Razzleberry and Crushed Curry! Enough already!
I did, however, want to try something a little different this morning, so I grabbed my In Colors and started playing. Here's what I came up with...
Melon Mambo, Rich Razzleberry and Glorious Green.
The supplies I used are:
*Cheep Talk (love that little bird!),
*Scallop Edge punch,
*Scissors to cut out the branch and bird by hand, and
*Dimensionals to pop them off the page.
What are you favourite In Colors?
Wednesday, August 12, 2009
A Simple Challenge
Hello there!
So, I challenged myself to create something simple. Not a tonne of layers, not a lot of techniques, not a lot of embellishments, not a lot of stamping. Turns out, I didn't have a lot of motivation, nor a lot of inspiration, and I was not winning the war against stamper's block.
This card was started last night. I had a couple of concepts in my head, but those of you who know me, know that what's in my head and what actually makes it onto the page are two completely different things! Needless to say, it wasn't working! So, I jumped on the computer to blog hop. Wow! There's a lot of wonderful, fantastic and beautiful work out there! I finally found a layout that I wanted to CAS' (Thanks to Harriet Skelly) and I got to work.
Well, kinda...
It just wasn't getting onto the page. Argh! I left it on the table right where it was!!
I was up tossing and turning last night, thinking about this stinkin' card!!
This morning I came downstairs renewed, re-energized, ready! And it only took me 15 minutes - start to finish!!
Colours used are Soft Suede, Elegant Eggplant, Ruby Red and Very Vanilla. The DSP is Autumn Traditions. Stamp set is Warm Words inked in Soft Suede. Button comes from the Button Latte collection, which you can get for free when you purchase $45 from the Growing Up section of the idea book & catalogue.
And there's a little something special about the button. Thanks to Andrea Walford for this cute little tip! Instead of having thread in multiple colours, she suggests using tiny strips of card stock, so your button is always co-ordinated! Super simple - thread through the front of the button, mini-glue dot on the back to hold down the paper and snip the extras off the ends! How cool is that!?!?
Tuesday, August 11, 2009
Rose Red
Turns out it's my favourite colour! I find myself reaching for it time and time again!
This card uses the All in the Family set, I do enjoy the versatility of this set! But it also features our Sticky Cuts Letters, Rose Red DSP, the 1 3/8" circle punch and the Scallop Circle punch. To make the letter all a-glitter is easy. Sticky Cuts letters come on a 12" x 12" sheet and have "backing" on both sides. They're basically die cut, so you just have to pop them out of the large sheet without removing either one of the backings. Once it's popped out, I remove the backing from the side I want to be glittery and lay it down on a sheet of copy paper. I pour the glitter over top of the entire letter, fold the copy paper in half to smoosh (getting the visual?) the glitter right into the letter, open up the copy paper, pull the letter out and pour the glitter right back into the container. Once I'm ready to put the letter onto my card, I remove the backing from the other side and it's done! And super pretty I might add!!!
The rest of the card is pretty simple. A couple different patterns of DSP, a strip of Whisper White to separate the DSP, a couple scraps that I hand-wrote "is" & "for" onto and I used my marker to ink up only the word "birthday".
I stamped, coloured and then cut out the birthday hat so it would pop off the card a tiny bit and so it would look like she was actually wearing it.
What's your favourite colour?
Monday, August 10, 2009
Love Fifth Avenue Floral!
Hello there!
Can you tell how much I love (LOVE!!) the Fifth Avenue Floral set!?!?
This card uses Chocolate Chip, Bashful Blue, Old Olive and Very Vanilla. I used the Manhattan Flower folder (not texturz plate) to dry emboss the Bashful Blue background piece, stamped the rose images in Chocolate Chip, Bashful Blue and a little bit of Old Olive. The sentiment is inked in Old Olive on Very Vanilla and sponged on the edges in Bashful Blue. There's Chocolate 1/4" grosgrain ribbon with 2 brads from the Vintage collection. Last but not least, there's some paper piercing around about 1/3 of the Wide Oval I punched out.
Truth be told, I need my piercing template! It's difficult for me to pierce around a corner!
Enjoy the card!
Sunday, August 9, 2009
Wedding with Fifth Avenue Floral
I'm not happy with the picture of it, but I am happy with the card for today.
Here's a simple wedding card I've made on Basic Black. I stamped out the gorgeous roses in White Craft Ink and then used clear embossing powder on them to keep them crisp. There's some Hodgepodge Hardware in the bottom right-hand corner. I actually inked it with White Craft Ink, poured some clear embossing powder on it and heat set it to change it from its' original colour of Antique Brass. There's a 1" x 1 1/8" piece of Whisper White card stock inside the hardware and the "s" was done with Timeless Type Junior Alphabet in the Big Shot. The intention is that it's "monogrammed" for them! Strung some pink 1/4" grosgrain ribbon and voila! Simple to make & sophisticated-looking wedding card!
Have a stress-free Sunday!
Friday, August 7, 2009
Crazy 4 Cupcakes!
Hi there! Who, tell me who doesn't love cupcakes!?!?
This card uses the Cupcakes wheel, inked in Basic Black. I used Pixie Pink, Bashful Blue & Gable Green markers (with a blender pen) to colour the cupcakes on the watercolor paper.
happy birthday was created in the Big Shot with Timeless Type Junior Alphabet in Bashful Blue and I sponged the edges of the letters in Bashful Blue. There's 4 fire rhinestone brads securing the watercolor paper to the Pixie Pink & Gable Green layers and there you have it!
I think it's classically cute - one of my favourite terms!
Have a great day!
Thursday, August 6, 2009
Much better!
Good morning! I'm having a much better day than I did yesterday. It seemed everything I touched went a little wrong - especially in my stamp room.
On a more positive note, the kickboxing class last night was incredibly therapeutic and I'm certainly feeling its' effects this morning!
On to the card!
The colours used are Taken with Teal, Certainly Celery and Apricot Appeal. I used my Circle Scissors Plus to create the circles in the focal point and punches (1" & 1 1/4") for the portion down the left side. I sponged Taken with Teal ink onto a scrap piece of card stock and punched out 1/2" circles to give the fake embossed look for the background. Also, I broke out the lamb from the words with my Basic Black marker for the sentiment and the lamb.
I think the lamb from Pun Fun is adorable. Especially since it's holding a little heart! I was thinking about what else I could create with this little darling? Well, I'm fortunate to have a six year old in my life, so that lead to an arts and crafts frame of mind and HA! Cotton balls!! The first time I tried this I balled up little shreds of cotton balls in my fingertips. I wasn't super pleased with that look, but I'll be sure to show you that at some point (that little one is still hanging out on my table!). I decided I liked just some wispy cotton instead.
I would love to know what you think!
Wednesday, August 5, 2009
I'll be back...
Today is proving to be one of those days where nothing is going right - already!
The creation for today is not dry yet, therefore not photographed and not posted. I'll be back when hopefully the little prince takes his second nap!?!?
Wish me luck and please do check back later! :0)
The creation for today is not dry yet, therefore not photographed and not posted. I'll be back when hopefully the little prince takes his second nap!?!?
Wish me luck and please do check back later! :0)
Tuesday, August 4, 2009
All in the Family
I wanted to share this card with you today to show you how much I love the All in the Family set. I've used this set to make kid birthday cards, our Christmas cards for last year (that's what you're looking at now), retirement cards (think - "from all of us"), you name it.
Pay no attention to the colours used or the DSP on the actual card. I'm pretty sure all of it with the exception of Very Vanilla is retired. Makes sense that this was last year's Christmas cards! I do enjoy the little cutouts on the corners of the layers though - I did that using a circle punch, but only put it about 1/3 to 1/2 way on the corner. I like the traditional look it gives.
Oh, and I wanted to tell you about a promotion Stampin' Up! is offering this month.
When you spend $45 on stamp sets from the Growing Up section of the 2009-2010 Idea Book & Catalogue (pages 74-90) you'll get a FREE package of Designer buttons! Here's a picture of some of the buttons you can get for free:You get 28 stamps in All in the Family and it costs $51.95 - so you're guaranteed to get 1 pack (30 buttons) for free. Choose from Playground, Sherbet or Button Latte.
Well, my princess is back so we have lots of things to do today! See you tomorrow!
Monday, August 3, 2009
Asian Artistry
Here's a little something that is a little outside my comfort zone. I don't use a lot of "pretty" flowers in my cards, usually very commercial/contemporary or not at all. But I decided to try something different.
I used Asian Artistry, which is a Level 2 Hostess set. Which means you can earn it free when you host a workshop.
The colours are Elegant Eggplant, Rose Red, Old Olive and Very Vanilla. I watercoloured the main flower image using markers and a blender pen. The grass was done with an Old Olive stamp pad. For the sentiment, I used my Basic Black marker to "break" out the stamp, inked each section and stamped separately onto 3/8" twill tape. I used Ice Rhinestone brads to secure it to the front of my card.
Enjoy what's left on your long weekend!
Sunday, August 2, 2009
Some more scrapbooking
I suppose you can tell what I've been doing with my long weekend!?
With half the family out of the house and a small prince who naps twice a day, I've been getting some serious work done around here. Fun work, that is!
I had talked about using the Color Wheel as a very trustworthy tool for determining colour combos the other day, well, another idea is using our Designer Series Paper as the starting point. This colour combo is Basic Black, Perfect Plum, Pumpkin Pie and Old Olive. Taken from Cast-A-Spell on page 161 of the catalogue. I used Perfect Plum DSP, Old Olive textured card stock, 8 1/2 x 11 card stock in Pumpkin Pie and (I'm sorry!) but I couldn't find any 12 x 12 Basic Black card stock, so I had to use what I had on hand in the retired Rockabilly Speciality DSP. But it did give me the opportunity to do the "opposite stripes" look with this layout. To say I went a little crazy with the brads would be an understatement...there's a combo of black (from the vintage collection), fire and ice rhinestones. The flash of the camera took away the colours, but they sure are shiny! I used my Big Shot to create the title using Timeless Type Junior Alphabet (yup, love it!!) and there's some black gingham ribbon. Can you believe I don't have a single Halloween stamp set?!?! I love Halloween and seem to no longer have even any retired sets left. Gotta go rewrite my wish list...enjoy the rest of your weekend!
Saturday, August 1, 2009
hello!
I really enjoy scrapbooking, but even I find that I MUST schedule the time to get my pages done. It seems with every digital shot I take, I can see the page in my head. But then life gets in the way and I don't get the pictures printed quickly enough AND there's dozens (dare I say hundreds) of older photos sitting here that need to be done AND of course, sometimes I'm just too tired at the end of the day! I decided this year to stop making excuses and that no matter what, I am going to scrapbook this year and my goodness, I'm actually doing it...slowly!
This page is about the little prince meeting some important people in his life. I don't have "permission" from everyone on the page to publish their image, so hence it's been photoshop'd!
Colours used are Brocade Blue, Chocolate Chip and More Mustard. I love, love, love this colours together. The largest pieces are textured card stock, smaller pieces are 8 1/2 x 11 card stock and there's some Chocolate Chip DSP. I used the brand new Timeless Type Junior alphabet in my Big Shot for the title and there's also some delicious Chocolate Chip Corduroy Buttons!
I can't say that I know for sure that this page is completely done, but I am pretty happy with it.
Let me know what you think!
Subscribe to:
Posts (Atom)