Friday, July 31, 2009

Miss them already...


*sniff, sniff*...two of my favourite people are off!
They've gone camping and I won't see them again until Monday.

The princess has been begging Daddy to go camping forever, and he's been promising her that they would go!
Well, now they're finally going and I'm so sad to see them go. I know they'll have a blast, if she can make it the 6 hours to get there. Thankfully she has a portable DVD player and a whole bag of movies to watch!

They're heading to Bray Lake (or something like that) north of Huntsville, they'll be right on the lake and she's soooooo excited!
They'll be roasting marshmallows, telling ghost stories, going for hikes, fishing, swimming in the lake and sleeping in their sleeping bags. I was surprised the child finally fell asleep last night she was so pumped up!

Well, I'll be back with another post if I can pull myself together - *tear*!

Thursday, July 30, 2009

More Pun Fun


Good morning!

Here's the other 3 cards we made for the Six Ways to Watercolour class from Tuesday night.

I really, really enjoy Pun Fun. It's so incredibly versatile. I choose not to break out the words from the images for these cards, but if you do - it opens up even more possibilities for this set.

As far as colour-combinations go, I trust my Color Coach! It's that little wheel on page 155 of the catalogue. For $13.25, it gives you multiple combinations for all the Color Families. The In Color selections aren't on there. I'm not going to lie - after 4 years I'm still surprised when I turn that wheel sometimes! Oh, and, I also installed a Color-Combo "machine" as an icon on this page along the right-hand side, if you're interested!

Have a terrific Thursday!

Wednesday, July 29, 2009

Pun Fun


Watercolouring is a lot of fun and actually, I find it very therapeutic! Thank-you to my Secret Agents for joining me for a very fun class last night!

I kept the actual cards fairly simple and they sort of match, you could give these as a gift. I really wanted the focus of the card to be the images that were watercoloured, not a fancy-smnancy card!

We used 6 different ways to watercolour:
Watercolor Wonder Crayons, Watercolor Pencils, Stampin' Pastels, Classic Ink Stampin' Pads, Stampin' Write Markers and Classic Ink Refills. Although Ink Refills I find messy, so I didn't actually use that method yesterday! I think my favourite method is using the pencils and/or markers, but I definitely don't enjoy the crayons! I'll be running this class again sometime in the fall - why don't you sign up to determine your favourite way to watercolour!?
I'll be sure to show you the other 3 cards tomorrow!

Tuesday, July 28, 2009

Out of the Box

Good morning! I had promised my princess that when her brother took his morning nap, we would spend some time in Mommy's stamping room. I wanted to make this card that I was thinking about and what better way to keep her entertained...at least for a little while!

This is a Level One Hostess set - Out of the Box. I think it's really cute, which is why I had used it a couple weeks ago on that "boing" page I did. Colours used are Chocolate Chip, Rose Red and Whisper White. While I'm not so great at paper-piercing, I do enjoy it. Especially the way it looks! Thanks goodness for the Mat Pack that Stampin' Up! sells. I used a couple dimensionals and some Crystal Effects on the heart to make it pop and oh, "LOVE many things." comes from the Dreams du Jour set. I just used my marker to ink only those words.

The princess is gone now (off playing in the family room) but we took some pictures of her creation:

She used as many markers as she could, a couple rhinestone brads, some snowflakes (which make perfect sense underneath a rainbow), some stars and button brads. At first I thought she was just going to use the markers, but then she had an "a-ha" moment and stole the set I was using and stamped each one of those images except the spring. Funny, I don't think she gets the whole concept of a jack-in-the-box yet. Weird!
Have a terrific Tuesday!

Monday, July 27, 2009

Just love birthdays!

Sorry about posting so late today...it's been a really hectic day. My princess is not in soccer camp this week, so she likes to keep me on my toes! And big news - she has 2 loose teeth! She is sooooo excited about this! She has been waiting for a loose tooth since she was about 3 1/2 years old, so you can imagine the hysteria over 2 loose teeth!

Today's card was actually for a darling little girl who just turned 2 this past Thursday! She has such a sweet, coy and gentle temperament, so this card was perfect for her 2nd birthday celebration!

I used Almost Amethyst, Rose Red, Regal Rose, Whisper White and Basic Black. The Cupcakes Standard Wheel was inked in Rose Red along the left hand side and I used the Big Shot for the letters to spell out sweet. There's the Scallop Circle Punch and the 1 3/8" Circle Punch (which is a favourite combo of mine) and two black brads from the vintage collection.

I'll be back tomorrow, hopefully with a cute little surprise! We'll see ;)

Saturday, July 25, 2009

5th Ave Floral - The Stairwell

Finally!! I absolutely adore my husband, but wow, it's like pulling teeth sometimes! Truth be told, it took him all of 7 minutes to get them done too, what took him so long - who knows?
As promised - here's the completed project:


As soon as you walk into my home there's a large stairwell and I've been working on it since we moved here 5 years ago. Four years ago, I got the mirror and the 2 shelves. My sister gave us the picture frame about 3 years ago and for a while that was all that was in there. I have been eyeing the Manhattan Flower decor elements ever since Stampin' Up! came out with them, but wasn't sure that the Kraft would work in this space. When the definitely decorative catalogue arrived and I found that Certainly Celery and Basic Black had been added - SOLD!
I had some Urban Oasis DSP left over (love it!) from the candle class that we had here, so I thought why not make more of those cute little votives for the shelf? I also popped some of that DSP into a few simple black frames I had lying around, and there you have it!
Let me know what you think and enjoy your weekend!

Friday, July 24, 2009

Fifth Avenue Floral - a preview...

Sorry about my late post today, I'm not feeling so hot right now. For 2 weeks now I've been having horrible back pain. I went to the massage therapist last night and she's fairly certain that I've popped a rib! Can you believe it??? I don't know exactly what to do, other than have my princess walk on my back some more...if you have any thoughts - please send them my way!

Today's post is a little preview. While I wait for my darling husband to put the finishing touches on a project I've been working away on, I wanted to give you a sneak peek. He assures me that he'll finish this task up for me this evening, so here's hoping! I should be able to show you the finished project tomorrow morning!
Thanks for stopping by!

Thursday, July 23, 2009

Very Thankful (a little different)

As promised, here's a different card using the same "Very Thankful" stamp set. I figured the previous one was cutesy, so I should try a little elegance for this one. I'm pretty happy with the way it turned out!

I stamped the peacock in Basic Black on the Whisper White card stock. Using a scrap piece of Whisper White, I coloured random sections of different colours with my new In Color markers. You heard me right, MARKERS!!

I stamped the peacock again in Basic Black over top of where I had coloured so some of the colours would show through the stamped image. Originally, I cut out the entire peacock (body, neck, head) but I didn't like that look, so I used just the tail portion and popped it off the page with a couple of dimensionals. I cut strips of Melon Mambo, Bermuda Bay, Rich Razzleberry and Crushed Curry to layer behind. That's our black gingham ribbon attached with an Ice Rhinestone brad.

Let me know what you think!

Wednesday, July 22, 2009

Embrace Life

Good morning! This is a very delicate card in my opinion! Very intricate and detailed, but fairly simple to create. The images come from the "Embrace Life" stamp set. Colours used on today's card are Rose Red, Brilliant Blue and Whisper White. I used Rose Red to stamp the flowers on the background of the card, but used markers to colour the same set of flowers for the Whisper White piece. When you're using markers you can ink only the portions of the stamp that you want, use multiple different colours and stamp once. When using multiple colours, you'll want to "huff" on the stamp to re-moisten the ink to ensure it stamp a quality image. So, that's what I did here. I also used Whisper White grosgrain ribbon - I know what you're thinking, "Ummm, Kim, the ribbon is blue!" I rarely buy different colours of ribbon in our 1/4" size. For the most part, I buy a tonne of the Whisper White and use my ink pad and a sponge to dye the ribbon whatever colour I want that day. I also pulled out my crimper and crimped about half of the Brilliant Blue layer. Stamped the sentiment in Brilliant Blue in the bottom right-hand corner and there you have it!
Enjoy the rest of your day!

Tuesday, July 21, 2009

Happy Birthday!

Who loves birthdays? It seems only kids seem to enjoy birthdays these days...my princess just loves everything about them! She loves to pick out presents for her friends, make their cards, pick out the wrapping paper/gift bag - everything! And she loves things that sparkle!

Today's card is a little sparkly!! I know, I know...this set is retired now, but I still love it! I used Goody, Goody Gumdrops that was a Level 3 hostess set from the Spring & Summer 2009 catalogue. The colours are Real Red, Bashful Blue and Whisper White. I actually stamped the "milkshake float" twice to cut out the pieces individually, coloured it with markers and used a little Crystal Effects to make the "cherry" stand out. Scalloped Circle Punch, Scallop Edged Punch and the Key Tag Punch are all there and 3 silvers brads and some fabulous glitter finish it off!

Time to find out why my little guy is still sleeping and hoping that you'll enjoy your birthday - whenever it may be!!

Monday, July 20, 2009

Very Thankful

Happy Monday morning to you! Regret my absence since Wednesday - things have been crazy around here. Too many things to do and not enough time to create! How many of you golf? Well, I certainly don't but that didn't stop my husband from taking me to the course on Saturday. I'm terrible! And playing 9 holes after a one & a half hour kickboxing class with nothing to eat? Take my word on it...don't do it!!

Anyhow, I think this is one of the CUTEST new sets in the catalogue! It's called Very Thankful and you'll find it on the back cover. It's this year's Ronald McDonald House Charities set and I love it! Stampin' Up! sends a donation to RMHC with every purchase of this set.

For this card I used the little turtle guy (I'm just in love with turtles these days!) and I used my Basic Black marker to ink up just the wagons, stamped those multiple times and then finished off with the turtle attached. I just drew some lines free-hand to connect all the wagons. The turtle is coloured with markers in Glorious Green, Gable Green and Green Galore, hearts are done in Real Red, and finally the wagon is outlined in Brilliant Blue and Summer Sun. I cleaned off my stamp and inked the "very thankful" separately to use it on the left side. I used my Big Shot and a Texturz Plate for the background in Brilliant Blue as well as for the smallest piece of Brilliant Blue. Sanding blocks along the top help to bring out the dry embossing too! A couple of buttons from the Fresh Favorites collection and there you have it!
If my little guy permits, I'll be spending some time down here to create a different card using this set this afternoon.

But I'll definitely see you tomorrow!

Wednesday, July 15, 2009

Flight of the Butterfly

Good morning!
I am so sore this morning - I had a great kickboxing class on Monday and I'm still feeling it in my back this morning. So much so, that my poor daughter was forced to rub my back with all her might this morning. What a great kid she is!
Anyhow...you didn't come here to listen to me complain!

I had so much fun creating this card. And I used bleach! The colours are Whisper White, Basic Black, and Real Red. I put a paper towel in the bottom of a small container, poured in a little bleach and used that as a stamp pad. You'll want to be careful to get the bleach only on the raised portions of your stamp. Too much bleach and it becomes a wee bit blotchy! Be sure to let it dry because you may not see the full effect on your paper until it does! I love how the bleach removes the colour from the black card stock, but you could also use white craft ink if you didn't want to try your hand at bleaching! Oh, and there's some red 1/4" grosgrain ribbon and a rub-ons from the Chit Chat collection.

Enjoy the card and wish me luck - kickboxing tonight!

Tuesday, July 14, 2009

Decor Elements Magic!

So, lately, everyone has been teasing me about going green! I was challenged a few months back by a wonderful customer of mine to do better (she didn't even though she had challenged me!) and it sort of took off from there. Now I wouldn't be caught dead without my reusable bags or throwing out cardboard boxes, baby food jars, etc! My husband LOVES the new me! ;)


This is my daughter's dresser - it was my dresser for years and years, but became hers. Her room does not support it in its' previous state. All of her furniture is white, her bedspread, picture frames, curtain rod, etc. So, this brown wood, old-fashioned looking piece was an eyesore at best! I had been mulling over what I was going to do with it for quite some time and loved the idea in the previous Decor Elements brochure. In April, I had just gotten her a new bedspread from Pottery Barn and was bringing some green into her pink & white room. Aha! I decided to use the Villa Designer Touch in Certainly Celery and this is how it turned out!

Monday, July 13, 2009

Teddy & Train


Good morning! I just love this set! I think it is soooo cute! I made this card for a baby shower, little boy of course - but think of how easy it would be to change out the colours!

I used the Teddy & Train set, the colours are Taken with Teal, Old Olive and Chocolate Chip. I watercoloured the bear and the train using a blender pen and markers. Of course I sponged the edges of the watercolour paper with Old Olive ink and was sure to use the blender pen to put a little swoosh under the bear to "ground" him. I learned that little trick at the Regionals in March.

Just a reminder that tomorrow's the last day to register for the 6 ways to watercolour class that I'm having here on Tuesday, July 28th at 7pm. Cost is $30/person and we'll be using the Pun Fun set, so the projects will be all occasion. Be sure to e-mail me at stampin.kim@rogers.com or give me a call to reserve your seat!

Have a marvelous Monday!

Saturday, July 11, 2009

Out of the Box

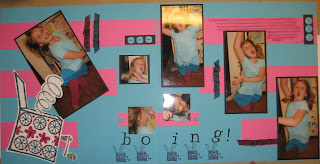
Good morning! This is a bit of a silly post this morning. Does your kid love the digital camera? Do you hear "let me see" over and over and over again? Our princess takes pictures of herself, the cats, her brother, everything it seems and loves for us to take her picture too! On occasion I like to scrapbook silly stuff. Non-life events, hanging around the house or even the pictures she takes. And that is where this came from. 7 pictures of her twirling, jumping and making funny faces. Over and over and over again.

The stamp set I used is called out of the box and it's a new level one hostess set. You can get it free with $200 order or when you host a workshop. A little twist on it, I wanted the "box" to be bigger, so I stamped it out on a piece of paper and then enlarged it on my printer and cut out the enlarged print. I think it's cute that it looks like she's popping out of the box. I stamped out the image in its' regular size for the title as well. Colours are: Tempting Turquoise, Pink Passion and Basic Black to match her "lovely" outfit (which she, of course, picked out herself!). I also used our Black gingham ribbon, but coloured it with Pink Passion and Tempting Turquoise markers to change it up.

Enjoy your Saturday!

Friday, July 10, 2009

B is for Birthday


It's Friday! So that means tomorrow night is a date with my man. Well, two of my men - my husband and my favourite UFC fighter. What more could a girl ask for?

Have I told you how much I love Crystal Effects? I made this card for my friend Shannon and it has 2 of my favourite things - Crystal Effects and glitter!

To make the butterflies, I stamped them in the same colour as my card stock and then carefully "globbed" crystal effects on them. Lay your card flat to dry - it'll run! You can kind of see it, but the butterflies literally pop off the page! For the "b" I used one of our Sticky Cuts letters, placed it in a piece of paper, poured glitter all over it, folded the paper over it to smoosh the glitter right into it, pulled the backing off the letter and voila! A super-sparkly, perfect letter and the glitter doesn't come off. And there's no cutting required!

Enjoy!

Thursday, July 9, 2009

12" x 12" single layout


Good morning! Here's a single layout that I created for my son's first scrapbook. I had been working on it since November. All the elements were laid out and ready to go, I just for the life of me couldn't figure out the title. 2 months ago while I was laying in bed, trying to get to sleep, it came to me. 281 days...I was pregnant for 281 days! Eureka! That's it! And here it is...
I used Chocolate Chip DSP and Tempting Turquoise (2 of my favs!). The most difficult part of this page (other than determining its' title) was going backwards and figuring out the number of days for each arrow.

Enjoy and there will be NO fat jokes!
(Oh, and, my apologies, but I'm a bit of a private journal'er and had to "smudge" it out with Photo Editor - sorry!)

Wednesday, July 8, 2009

A little weaving


Good morning! I'm in a bit of pain this morning...last night while I was half asleep, my darling little kitten (she's a fat cat) was sleeping at my feet. Apparently, she didn't like me rolling over and she dug her claws into the bottom of my foot like you wouldn't believe. Yup, even drew blood! Wow, it hurts!
Anyways, I wanted to show you a card that we made for my Girls' Night club.
The colours are certainly celery, apricot appeal and a wee bit of chocolate chip. Used the Big Shot to dry emboss the background after we used the brayer to apply some certainly celery ink. Also used birds & blooms die for the Big Shot for the flower. I just love layers!
The weaving technique is simple:
A piece of cardstock for the base
6 pieces of short ribbon (SAB - sorry!)
3 pieces of long ribbon (SAB - sorry!)
You adhere the short pieces along the top/back of the card stock and do the same thing with the long pieces on the side/back. From there, just adhere the pieces as you weave them over and under, I use adhesive throughout the entire process. Adhere the leftover length to the back side of the card stock and then adhere to the front of your card. It's that easy!
See you tomorrow!

Tuesday, July 7, 2009

Welcome frame

This is a simple welcome frame that hangs over the entrance into my kitchen. It took me a while to figure out where I was going to put it, as my "foyer" isn't much of a foyer. Linda Hansen had shown us a welcome plaque at Regionals back in March and I thought it was so nice, I had to make one for myself. This will be my "summer" one, and I'll make (& upload) ones for fall, winter and spring.
I used the Welcome from our definitely decorative brochure sized medium. The frame is 11" x 16" and I purchased it at Michael's. I found this one on super sale and painted it brown with dollar store paint to cover the white. There's six different colours/designs of DSP placed at various locations to change it up and I used my Big Shot and our Bigz Die Beautiful Butterflies to make the winged friends. They layer very nicely. I put the Welcome directly onto the glass so it'll be easy to change out the background. I say easy, but I think my husband would disagree as he had a terrible time putting it up on the wall for me.
Have a wonderful day!

Monday, July 6, 2009

A gift for Madame


Isn't it wonderful how kindergarteners sincerely love school and adore their teachers? Around here, that's certainly the case which is why we had been chatting for quite some time as to what we were going to do for Madame at the end of the school year.
When I saw this project in PaperCrafts magazine, I knew I had to CASE it.

We made a set of 6 thank-you cards for Madame to use herself and a cute little box/basket to keep them in until she used them. I used Washington Apple DSP (any DSP will work), colours are Bashful Blue, Pumpkin Pie and Riding Hood Red. I dyed the flowers from the Pretties kit using ink refills, small container and a bit of water. There's Fire/Ice rhinestone brads and I also used the corner rounder punch and eyelet border punch.
You'll need a 10" x 12" piece of card stock for the holder and here's a diagram:


Word has it, that the gift was "perfect"! Try it for yourself (wedding gifts, baby gifts, etc) and be sure to send me pics to stampin.kim@rogers.com so I can see what you've done!
Thanks for stopping by!

Sunday, July 5, 2009

My first post!


Welcome to my blog! I'm so excited that you've stopped by...it took me a while to get everything set up - but here it is!
My next dilemma was deciding what I would post as my first one ever!?!? So, I decided to show you a collection of cards that were my April/May card class designs. I hope you like them - I know the ladies who have joined me here in my stampin' room seemed to!
Check back tomorrow morning for a look at what we made for an end-of-the-year teacher gift for the princess' "Madame"!
Thanks for stopping by!

Click here to connect to my Stampin' Up! website:

Order Online